
How To: Load a Motorcycle in a Pickup Yourself
We make things that work better and last longer. Our products solve real problems with clean design and honest materials.
You’ve probably seen the fail videos of people dumping their bikes and even hurting themselves while loading a motorcycle. To an extent those videos do serve an instructional purpose—how NOT to load a motorcycle. But don’t let that scare you away from loading your own motorcycle safely and securely. I have been loading bikes on my own for nearly two decades without a single scratch to the bike. Follow along and see how easy and safe it can be.
Tools Required
Some of these may seem obvious, but if you haven’t done it before how would you know? Firstly, your pickup bed needs to have sufficient length. Most pickups will do, but if yours is extremely compact like some of the recent models like the Hyundai Santa Cruz, you might not have the right truck for the job. Measure from the leading edge of the front tire to the rear axle and add a few inches to that. Your total is the minimum length required. That little bit extra is for your ramps to overlap the tailgate. Your truck will also need anchor points located farther forward and lower than the handlebars. You’re going to be pulling the bike downward and up to the bulkhead. Most pickups will have those provisions, but best to verify ahead of time.
Speaking of ramps, I recommend getting two—one for the bike and one for yourself. If you’re on the tall end and/or your load height is particularly low, maybe you can get by with a step stool. Personally, I’m not on the taller end and my truck, like most these days, is about the same height as a 4x4 even though its rear wheel drive. The more rungs the ramp has the better. Your bike will roll over them more smoothly and you stand less of a chance of partially stepping through them as you make your way up or down. I find these inexpensive ramps from Cycle Gear work well. Remember to get two. Whatever your choice, be sure you get ramps built for the weight of your bike which include its own tie down strap.

Setting up ramps and preparing the bar harness
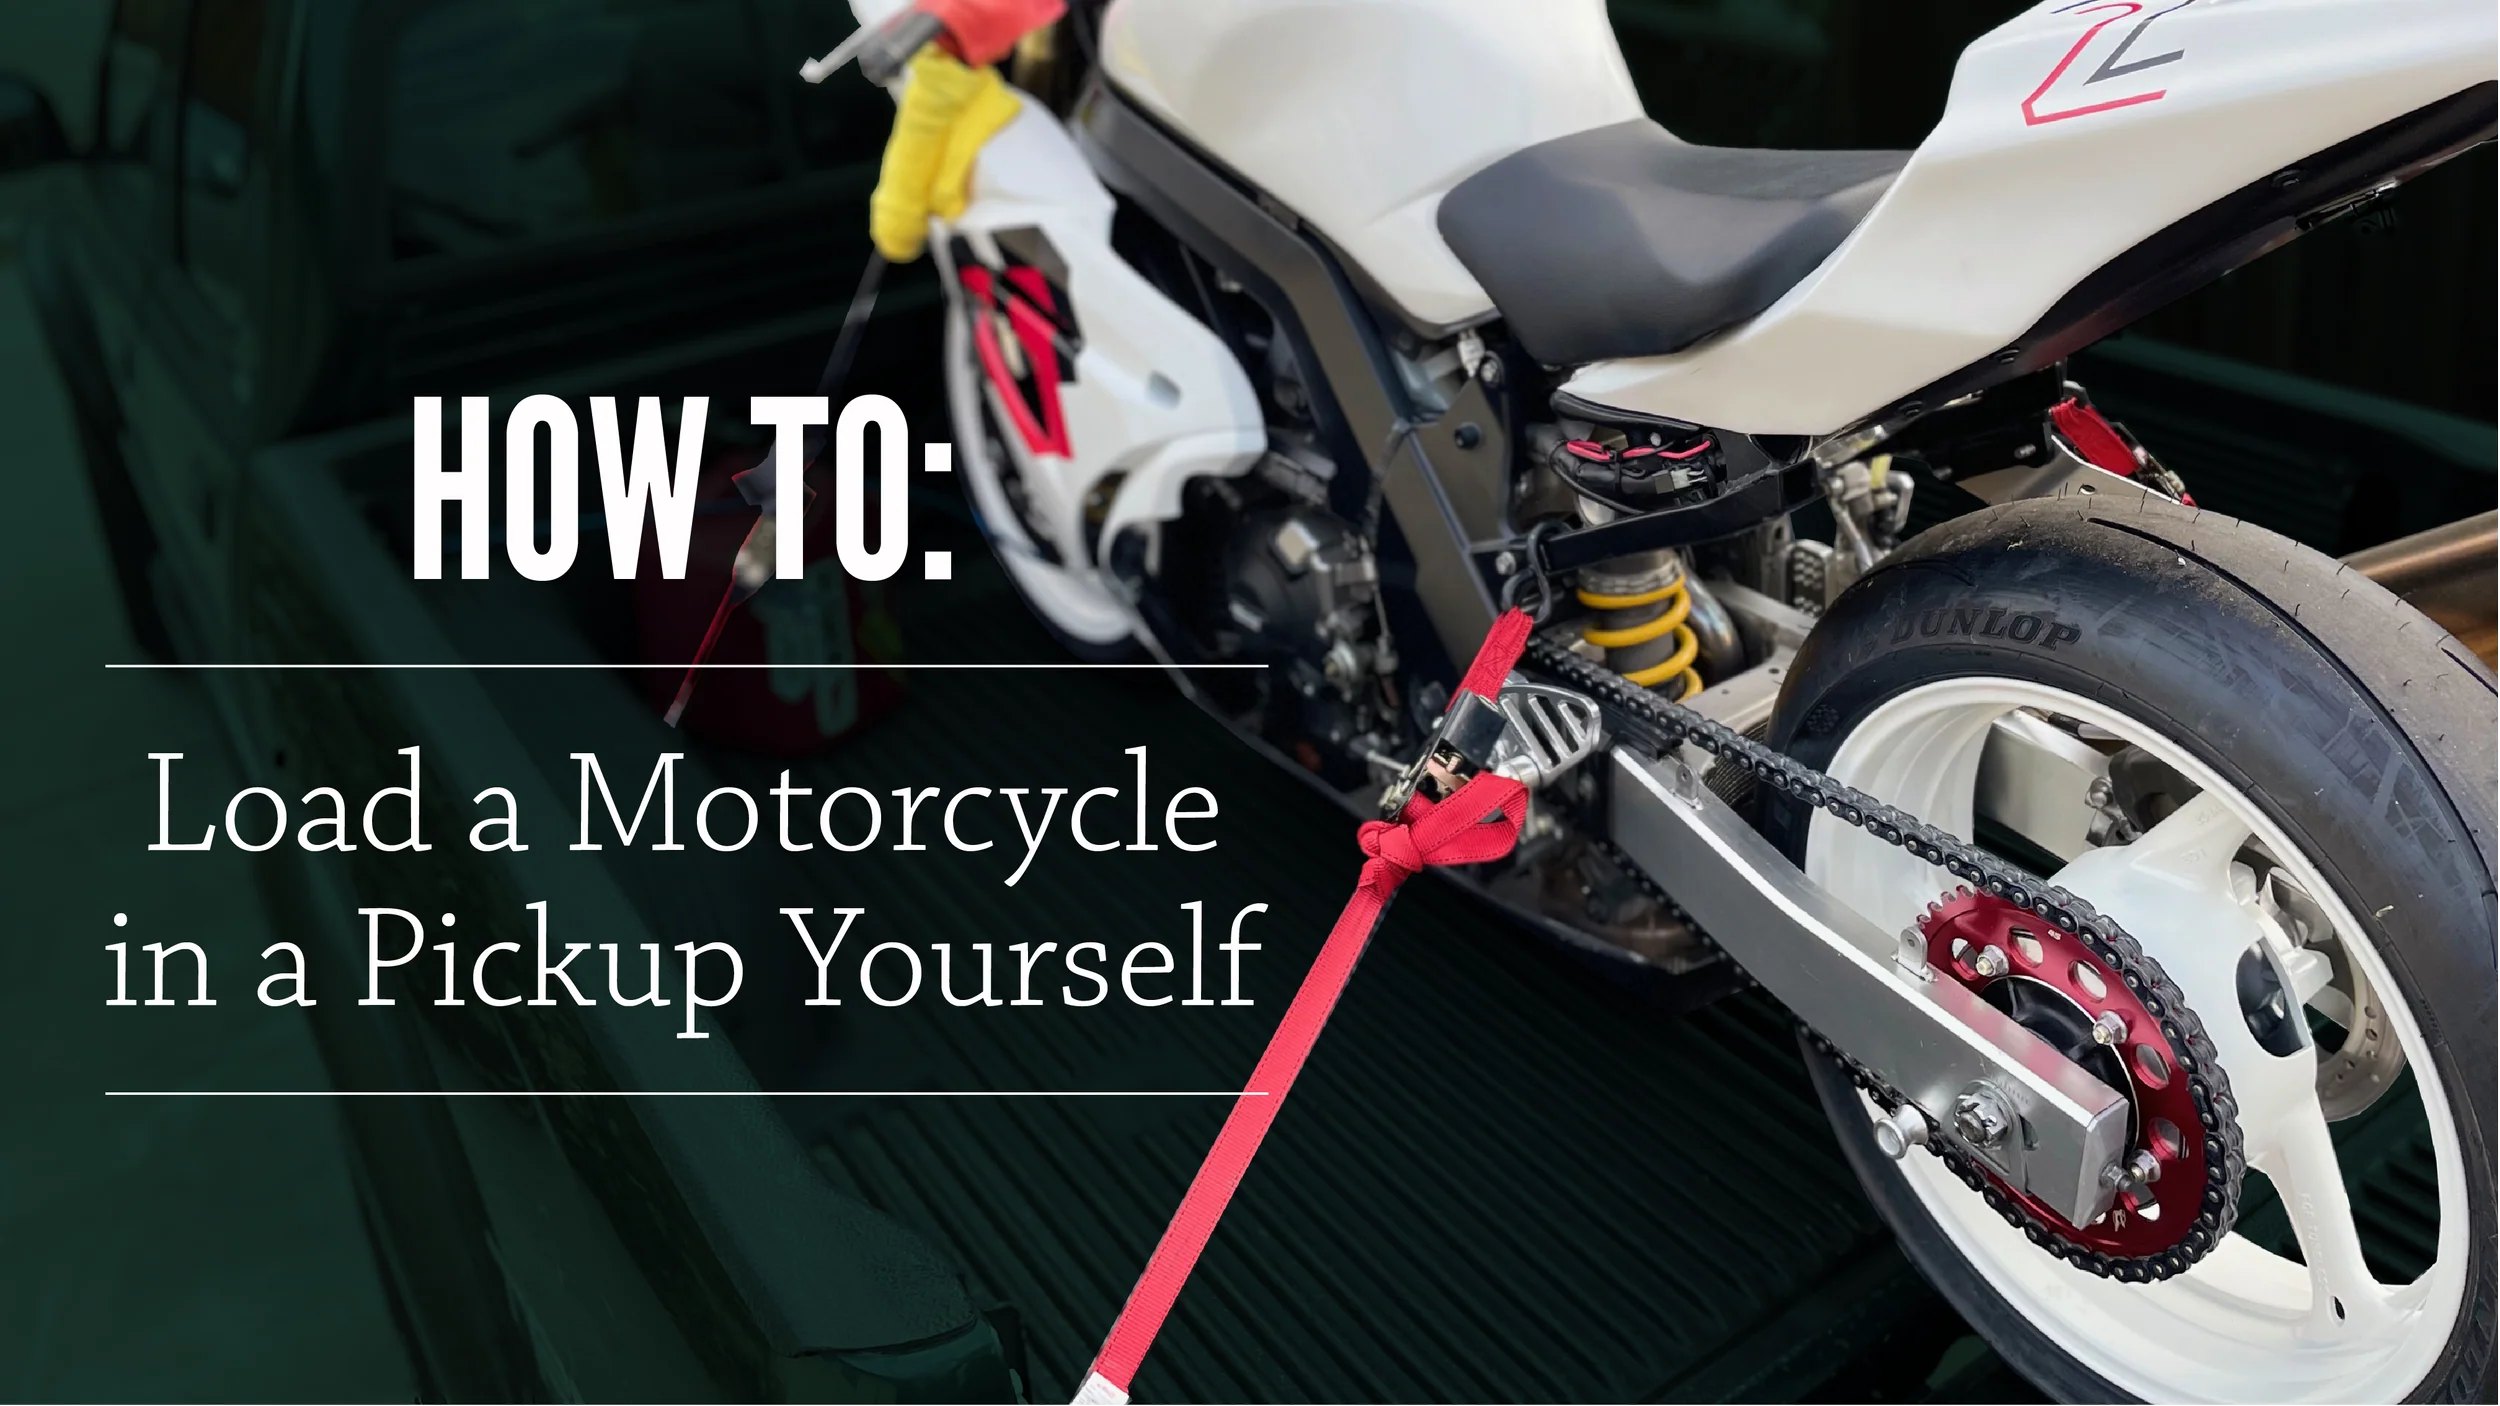
Lastly, you’ll need tie down straps. Avoid the cam buckle type. The suspension of your bike will compress in transit if you don’t cinch it down enough, causing looseness in the straps and you certainly don’t want that. Be sure to get tie downs with a ratchet mechanism. Although I use three personally, you can get by with a single strap, but if you do so, be sure to get a high quality strap built specifically for motorcycles. I use the original model of bar harness straps made by Canyon Dancer, though the newer model II is a bit nicer. Its bar end caps won’t pull on your grips, but if you have bar end mirrors you will either need the original model harness or you’ll need to remove the mirrors. Though many choose not to tie down the rear, it gives me peace of mind to do so and it doesn’t cost much or add much time to the process. For that, some standard 1” ratchet straps are adequate. I cut mine down to make set up easier. It leaves you with less to thread through the ratchet and less to tie up later. I use them solely for motorcycles anyhow.

Motorcycle bar harness tie down by Canyon Dancer. Note how this style can slide the grips toward center if you don’t have switches to prevent it.
Loading Up
Reducing your approach angle is a great way to make the job easier. If you have a loading dock or you can get your ramps on an incline, the whole process becomes much simpler. Like most people, I don’t live anywhere near a loading dock, but my driveway does have a decent grade. The street is crowned so placing the rear wheels in the gutter is the best I can do to get the tailgate low. None of this is necessary, but all of it is helpful.
Make sure you’ve got everything in place. At a minimum you’ll want your harness strap in the front of the bed, preferably attached to one anchor point and your ramps lined up and secured. If your bike has a side stand, getting your straps in place isn’t as critical. My track bike doesn’t have a stand of course, and if yours is similar you’ll want to make sure you’re not yelling over to the neighbor for help. Its best to center your bike’s ramp so your load is balanced. Even if the best of circumstances carrying a load like this will have a negative effect on the handling of your vehicle so you’ll want to minimize that by loading your bike properly. Make sure your ramps are tied down. By pulling down and forward, the strap ensures the leading edge of your ramp stays engaged with the tailgate. The last thing you want is for that ramp to move once you’re on it.
Line up your bike behind the ramp as best you can. Guiding the front wheel up is not a problem, but you don’t have control over the rear. If you come at the ramp from an angle, your rear tire may miss the ramp entirely. I haven’t had that happen personally, but I’ve seen it.

Ramp centered and bike aligned
Now you’re ready for action. Stand beside your bike and fire it up. I prefer to be on the left side because a) that’s how I’m used to approaching my bike and b) the exhaust is on the right and I like to avoid burns whenever possible. I also like to keep my weight to the back of the bike. On several occasions I’ve stood too far forward and banged my right shin on an unforgiving and very sharp foot peg. That’s a pain best avoided. Put the side stand up, cover your brake and clutch levers, put the bike in gear, and feather the clutch lever to get the bike moving forward. Continue this as you work your way slowly up the ramp. While momentum is your friend, don’t feel like you have to go full send, just make steady progress. You may even stall the bike in the process and that’s ok. I’ve done it more times than I’d care to admit. Thankfully you’ve got your brake lever covered so you’re not going to roll back down. You’ve got your clutch covered and your stand up, so restarting is a breeze. Just pick up where you left off until the bike is in the bed with the front tire up against the bulkhead. Go ahead and shut the engine off. If you have a side stand, now is a good time to use it. If you don’t (or you have a center stand) its a little trickier because now you have to hold up your bike while you attach the harness. For now, let’s assume you’re one of the 99% who do have a side stand. You can continue at a leisurely pace if you like. Either way, make sure your front wheel is pointed straight.
Tying Down
Attach your bar harness to your anchor points and to the bars themselves. Pull the straps through the ratchets so they’re no longer loose and ratchet them very slightly. Though the bike is leaning left, with each side of the harness engaged and the slack removed from the straps you no longer need to worry about the bike tipping over. Be sure to raise your stand at this point. Now you can exit the truck and put your ramps away. Taking care of them at this point means you’re not having to walk around them repeatedly as you move from one side of the pickup to the other. Start tightening on the right side of the bar harness. This will begin to compress your forks and bring the bike into a vertical position, just how you want it. Suspension travel varies widely, but with most street bikes, an inch or so of compression is sufficient. Take a look from the back to verify that its upright as possible. If so, you can stop here, though I prefer to take it one step further.

Front end secured with suspension sufficiently compressed
Call me a worrywart, but I like to know that the rest of the chassis is being pulled into compression against the truck bed, not just the front end. Who knows what kind of evasive maneuver you may have to pull off when you’re out on the road? I like to attach standard ratchet strap tie downs to each side of the subframe and compress the rear suspension an inch or so as well. Mounting points are as varied as motorcycles themselves, but do your best to pick one that a) does not allow the hooks to slide forward and back, and b) allows the strap to clear all your accessories such as mufflers, brake reservoirs, etc. Be sure to secure the excess strap length. Firstly, I prefer to cut mine so they aren’t a pain to tie up. An extra foot or two is sufficient. Be sure to melt the ends where you made the cut so they don’t fray. This also makes it easier to feed them through the buckle next time you use them.

Optional: tie down the rear as well
Driving Loaded
I don't mean drunk—never do that. Just beware that you now have an additional 300+ pounds behind you with a center of gravity a couple feet above the truck bed. Your vehicle is going to feel more inclined to lean in corners. Take it easy and you’ll be just fine. If you drive in a place with strong side winds you’re also going to feel like you have a sail attached to your pickup, and you kind of do. You may notice yourself tacking in to the wind a bit to go straight. This is all normal.

A fair bit of weight sitting high, but centered. If the straps come close to your fairings, some soft towels will provide a nice buffer.
Unloading
As you may have guessed, this is loading in reverse though in some ways easier, in some ways harder. Again, if you can use a loading dock or incline to your advantage, do so. Gravity is your friend this time, but a little goes a long way. If you’re going to the track, don’t be afraid to ask for help—its a great icebreaker. But let’s assume you’re fiercely independent, you got the bike in there yourself, right?
Start by removing the rear straps if you used them. The bike is plenty secure while your’e stationary without them. Then set up your ramps, remembering to line one up with the bike and to tie them down just as you did before. If your bike requires a rear stand, now is the time to get it ready, directly behind your ramp and back several feet. Get yourself into the bed, put the kickstand down, and move to the right side of the bike. Hold onto the left bar and release the right ratchet strap. This will cause the bike to tip to the left toward the stand. Let it gently do so. Now you can detach the harness from the bars. You may need to also release the left side ratchet, depending on your particular bike. I prefer to toss the strap over the windscreen at this point, but you can also remove it from the anchors. Regardless, make sure all the straps are out of your way. You don’t want to be tripping over them as you unload.
Level your bike, bring the kickstand up, take the bike out of gear, and cover your brake lever. As you roll it back, note the grooves in the truck bed or bed liner. Use these as a guide. If you got the bike in straight and your ramps are properly aligned, you can simply keep your front wheel in its tracks and all will line up nicely. It may take a bit of pulling to get that rear wheel onto the ramp. Once you do, gravity will start pulling the bike down. Allow it to do so, but don't be afraid to bring it to a stop if you need to. Keep an eye on that front wheel, ensuring it is aligned with the ramp and all will be well. Once down, simply lower the stand and you’re done.

Wrap Up
Once you’ve gotten used to the process you’ll wonder why anyone needed to write so much text about how to do it. It’s not terribly difficult, but it is a skill you learn and its one only a small subset of a small subset of people ever do. There’s no need to be embarrassed asking someone for help, but its also nice to know that you can do this yourself if need be.
Latest Article

Follow Us


Related Posts

